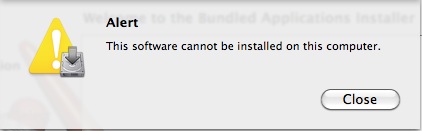
Snow Leopard & iLife - This software cannot be installed on this computer
Can’t get a bundled iLife’08 to install after a Snow Leopard clean install? Look no further! Here are 10 easy steps to getting everything working again!
I love Macintosh. I made the big switch back in around 2000 when the Titanium Powerbook came out. You can only imagine how disconcerting the message, “This software cannot be installed on this computer” could be for me after I upgraded all of our Macs to Snow Leopard!
Of course everyone on the support forums treats you like an imbecile and tells you to just use your original Leopard disks. I suppose that must work for some people but it didn’t work for a single computer that I own! If you’re like me then you’ll find this little walk-through useful. Here’s a few easy to follow steps that will allow you to successfully re-install iLife ’08 onto your clean install of Snow Leopard using your original media. Needless to say, you should have a license for all of the software that you’re using. I do. I’m more than happy to pay Apple’s very modest licensing fees. Anyway, enough preaching. Let’s get to the “How To!”
If you found this helpful you might also want to follow my much more active blog over at the SANS Institute!
Of course everyone on the support forums treats you like an imbecile and tells you to just use your original Leopard disks. I suppose that must work for some people but it didn’t work for a single computer that I own! If you’re like me then you’ll find this little walk-through useful. Here’s a few easy to follow steps that will allow you to successfully re-install iLife ’08 onto your clean install of Snow Leopard using your original media. Needless to say, you should have a license for all of the software that you’re using. I do. I’m more than happy to pay Apple’s very modest licensing fees. Anyway, enough preaching. Let’s get to the “How To!”
- Begin by inserting your original install DVD #1. After it’s installed pop open a Terminal window. The easiest way to do this is Command-Space to open Spotlight and type “Terminal” and then press enter.
- In the window that appears, enter the commands that you see in the image below:

- Quit out of the Terminal application.
- What you’ve just done is copied the installation package for the bundled software onto your desktop. Now we need to make some modifications. First, we need to gather some information. Pull down the Apple menu and choose “About This Mac”. In the window that appears please select “More Info...”
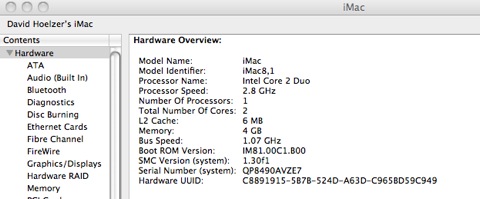
- In the information window that’s presented (pictured above) take special note of the “Model Identifier” line. In the sample image above you will see that it has a value of “iMac8,1”. This is an extremely important value for us.
- Next, right click on the “Bundled Software.mpkg” that’s sitting on your desktop and choose “Show Package Contents”.
- Open the “Contents” folder. Inside of it are two files and a folder. We will need to edit both of the files.
- Right click on the “Bundled Software.dist” file and choose “Open With”. In the file browser that appears, scroll down and select the TextEdit application (or any other text editor you might prefer).
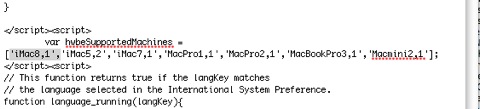
- Hit Command-F to open a find window. Search for “var hwbeSupportedMachines”. This will take you to the line that needs some changing. You will see a list of model identifier strings and you will also notice that your model is missing. Simply add it into the list! Here’s an example for iMac8,1:
- Save this file and close it up.
- Right click on the “Info.plist” file and allow it to open in the Propery List editor. If you don’t have the property list editor, any text editor will do. You simply need to locate a model identifier and change it to match the model identifier from your About This Mac research! Here’s ours in the Property List Editor with modifications:
- Save this file with modifications.

- At this point, eject DVD 1 and replace it with DVD Install Disc 2.
- Double-click on the “Bundled Software.mpkg” on your Desktop.
- That’s it! You can now proceed with a customized installation and select the iLife components that you need successfully!
If you found this helpful you might also want to follow my much more active blog over at the SANS Institute!